

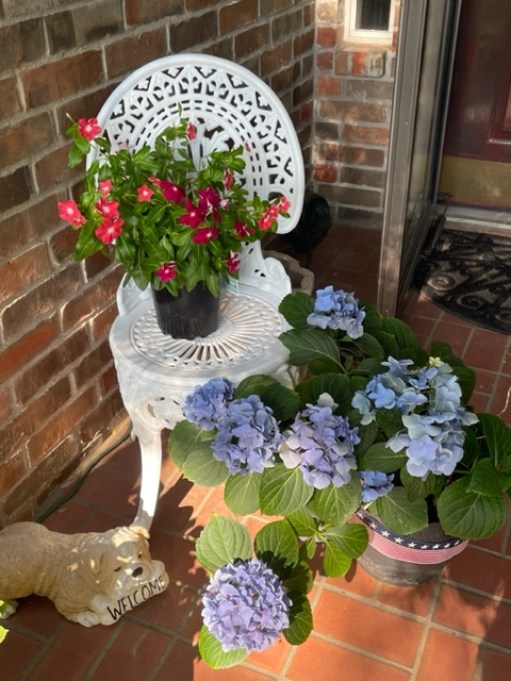
Happy summer to you, dear friends!!! I am enjoying this time off from work and just this past week I worked on another summer project ~ repainting our little metal chair which currently sits on the front porch…

This little chair was sold as part of a patio set which included two metal chairs and a small metal table back in the late 1990’s/early 2000’s. I believe I found it at Big Lots for around $99. They used to sell them every year and I waited for a set I liked before buying one.

The set held its paint for a good 25 years or so and was a nice green over black. When we were getting ready to sell our last house in 2015, my husband sold the table at one of our garage sales (a mistake!). The other chair had the back legs broken off several years prior and had been tossed (also by Hubby) at some point.

I think) It needs repainting again, too.
The paint on this remaining chair had seen better days, even in California, as it sat outside in our backyard or on the covered front porch all year long (there’s a photo somewhere with a small stack of pumpkins on this chair).
With Texas’ strong rainstorms, the remaining paint had been “sandblasted” off most of the chair, lol!
So it was a good candidate for a refresh…

How to begin?
I began this project with a good wipe down with just a clean damp rag, rinsing it out with the hose a couple of times. This removed all of the cobwebs and most of the dirt. I set the hose on “jet” and sprayed out the rest of the debris from underneath in the upper chair leg crevices. 🙂
After a dry in the hot morning sunshine, next I applied some elbow grease and a good scrub with a wire metal brush. This took off the biggest chunks of leftover paint and now there was clean metal ready to paint!

Lay down a paint cloth or old bed sheet (shown here), lay down your chair, and shake your paint can well for at least two minutes. I turned mine upside down, too, and continue shaking. Really helps mix the paint well!
Lightly spray over the surface of the metal using short bursts of paint and very quick sideways strokes as you spray. This gives a nice coating without paint “running” or “pooling” in cracks, which I wanted to stand out anyway and not be all gooped up.

Paint as much of the chair in this position, let dry at least 2 hours. This allows for painting as much of the chair at one time as possible. Some people like to stand up their chairs to spray paint, but this is what I like. 🙂

Stand chair up after the appropriate drying time (per paint can manufacturer) and paint the other side of the backrest plus paint over any missed spots of exposed metal.
Paint a light second coat and let dry again.
***Tip: When you are done painting, turn the paint can upside down and spray a little out of the can to “clear the tube.” This makes it a possibility of saving the leftover paint and using it next time. Otherwise, the tube is often clogged and you’ll have to throw out the remaining paint.
And that’s all there is to spray painting metal chairs!
Sometimes you have to tape off parts, if you are doing multiple paints. I tape off the teak bench and I’ll be doing that soon to repaint it.
Happy painting!
Barb 🙂
I love those chairs and they look great all refreshed!
Thanks, Amber! I wish I still had the whole set but I’m glad to have this one chair. Glad you stopped by! I’ll look for your posts. 💕
Oh, that turned out great, Barb! Good tips, too.
Thank you, Rita. I do love how this little cast aluminum chair turned out. Shouldn’t need another paint job for a while! Happy weekend!!!
It looks so much better Barbara!!
Mary!!! Thank you so much! I’m glad you stopped by. I miss coming over to The Boondocks blog and seeing posts from Greece and now New York, although I see your posts on IG all the time. 🙂 Hope you guys are keeping cool up there! Yesterday was supposed to be the highest temp (107, I think) during this heat spell. Heading back down to a nice 86 in a couple of days ~ relief for us and the plants! Have a great weekend!!!